
What is Fascial Counterstrain?
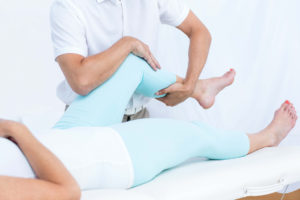
Fascial Counterstrain, initially called Strain Counterstrain, was recently developed by osteopathic physical therapist, Brian Tuckey, PT. The original technique was developed by Lawrence Jones, DO over a 40 year period starting in 1955. In observing a skilled Fascial Counterstrain practitioner, you will immediately be impressed with how gentle and non-traumatic this technique is for treating the painful patient. A clinician is quickly able to assess the entire body for areas of pain and dysfunction and identify the specific treatment needed to correct the dysfunction and alleviate the pain. Nearly every painful condition can benefit from this gentle technique.
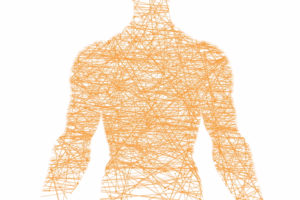
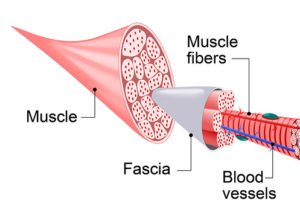
 Fascial Counterstrain is a manual therapy technique, meaning the clinician uses only their hands to find and fix fascial dysfunction. Recent research has shown that nearly all painful conditions are accompanied by inflammation of the fascia, or connective tissue that is abundant throughout the entire body. It covers all muscles, bones, nerves, arteries, veins and internal organs of the body. In other words, fascia is everywhere throughout the human body. (Visualize biting into an orange wedge – the webbing that holds those individually wrapped pods is similar to our fascia).
Picture a frightened turtle – when traumatized, he contracts (hides) back into his shell. This is similar to traumatized fascia contracting.

Fascia is filled with millions of nerve endings (as well as smooth muscle cells) so that it can contract if injured or traumatized. When there is sufficient trauma or strain to an area (like a quick, unexpected stretch, strain, prolonged bad posture, surgery, or a direct blow), the smooth muscle in the fascia contracts (tightens), and the nerve endings start producing inflammatory chemicals.
Practitioners of Fascial Counterstrain (usually specially trained physical therapists) look for very specific “tender points” on the body that tell which particular fascial structure is involved, similar to how a road map tells you which roads lead to where. The physical therapist will then shorten the particular fascial structure manually until they feel a “pulsing” at the tender point associated with that fascial structure. This position is held for 15-90 seconds, and when the therapist releases the shortened tissue, the nerve ending and smooth muscle in the fascia are “reset,” therefore stopping the inflammation and spasm in that area of fascia. There are nearly 700 fascial “tender points” in the human body, and the number of tender points that need to be treated varies between individuals, depending on the severity of the problem.
Fascial Counterstrain treats the most fundamental aspect of nearly every painful condition. It facilitates healing in the body, and usually a few simple exercises can help prevent the fascial dysfunction, inflammation, spasm, and pain from returning.
 Fascial Counterstrain has an exceptionally broad application for physical ailments. It can be used for the very acute traumas (i.e. sports injuries, motor vehicle accidents, ankle sprains, post-surgical, etc.) to the more chronic (i.e. osteoarthritis, fibromyalgia, TMJ pain, headaches, etc.). Its value with the acute patient is unmatched because it is so gentle and non-traumatic. The clinician is guided by what feels good to the patient and often dramatic changes are made to include decreased pain, muscle guarding, and swelling. These changes facilitate the patient’s healing processes for a faster and more complete recovery. The gentleness of Fascial Counterstrain makes it safe and effective for treating fragile patients (i.e., infants with torticollis, elderly patients with osteoporosis, arthritis, stress fractures, pregnancy or pelvic pain patients, post-operative pain, etc.) and the pain associated with EDS (Ehlers-Danlos Syndrome) and excessive joint motion or hyper-mobility. Fascial Counterstrain is valuable for the chronic pain patient because it addresses long-standing neuromuscular problems by reducing inflammation and relaxing muscle spasm.
Fascial Counterstrain is a non-traumatic manual therapy technique that can be used on a large population of musculoskeletal pain patients. If you can benefit from this technique, search for a clinician who has attended Jones Institute Counterstrain courses. Burkhardt Physical Therapy Center has the only therapist in La Crosse County that is certified in Jones Counterstrain. All therapists at Burkhardt Physical Therapy Center have been trained by Brian Tuckey, PT and receive one-on-one clinical training to perfect their skill in performing Fascial Counterstrain.
Call us today to schedule your PT evaluation session. If you are still not sure if it is right for you, ask to schedule a free, no-obligation Counterstrain screen.
You have nothing to lose but the pain!
Material Sources:
What is Strain Counterstrain?
How does Strain Counterstrain work?
How was this developed?
What can I expect after Strain Counterstrain treatment?
Are there any restrictions following treatment?
Why hasn’t my doctor heard of Strain Counterstrain?
What type of conditions does Strain Counterstrain treat?
What to do after a Counterstrain treatment:
- Despite the gentle nature of the Counterstrain technique it is normal for patients to experience soreness, especially following the first treatment. The soreness can last for 1-3 days. This is a normal response from your body as it heals and gets accustomed to the new range of motion and use of muscles.
- Always take a short walk and/or move in an easy fashion immediately following treatment so your body can experience the changes before you get into your vehicle.
- Once you are home, it is good to perform gentle stretching and movement to assist with keeping the muscles loose and circulation flowing.
- You may experience fatigue and sleepiness. Listen to your body after a treatment and take a nap or go to bed early for the next few nights. Rest helps your body heal. Get into a position of comfort using pillows and being creative, allow yourself to continue to self Counterstrain.
- Keep hydrated to assist with the removal of waste products from the release of tension, inflammation, and tissue congestion. It is recommended to drink ½ your weight in ounces, daily. For example: if you weight 150 pounds, you should drink 75 ounces of water per day.
- Avoid beverages that are caffeinated or high in sugar. They will dehydrate your system and activate your fight or flight nervous system. Consider herbal tea as a good alternative.
- You may use heat or ice for 10-20 minutes to reduce muscle soreness.
- Avoid exercise involving resistance, such as lifting heavy weights, cleaning house, or doing heavy yard work. Exercising too soon following treatment can re-injure healing tissue.
- Try to prevent quick movements, especially of the body part being treated. Move in a slow and deliberate manner for at least 2 days following treatment.
- If possible, avoid other forms of treatment such as chiropractic care (due to the quick movements of adjustments) for 3-4 days after treatment.
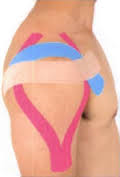
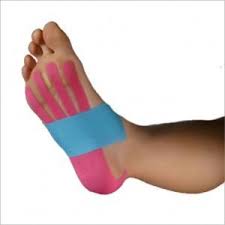
- You can use Kinesio Tape over the sore muscles to assist with improved lymphatic drainage, remove congestion from the tissues and to help the muscles relax.
- It is ok to use Biofreeze or another pain relieving gel or cream, as needed.
- You may use over the counter medications, as needed and if approved by your doctor.
- Consider a detox bath with Epsom salts and baking soda. Here are two simple recipes to try: Recipe #1: 3 cups of Epsom Salt (or 1 cup for every 60 pounds of body weight,) 1 cup of baking soda, 1/3 cup hydrogen peroxide. Recipe #2: 1/3 cup Epsom Salt, 1/3 cup sea salt, 1/3 cup baking soda, 2 ½ tsp ground ginger, 1 cup apple cider vinegar.
- *If you experience flu-like symptoms or a headache following treatment, this could be a Herxheimer Reaction from detoxification. Try dissolving ¼-½ teaspoon of baking soda in a small amount of water. Drink this every 3-4 hours until symptoms subside. Consult with your doctor or pharmacist first if you are taking medications or have other medical concerns.
- Do not hesitate to call your physical therapist if you have any further questions.
What is Dry Needling Technique?
Is Dry Needling similar to acupuncture?
How does Dry Needling work?
What type of problems can be treated with Dry Needling?
Is this treatment painful?
Are the needles sterile?
What side effects can I expect after the treatment?
What should I do after having this treatment?
How long does it take for the treatment to work?
Why is my doctor unfamiliar with dry needling?
Where does dry needling fit in the entire rehabilitation program?
Once I am feeling better, how often do I need to come back to maintain progress?
What to do after Trigger Point Release Therapy
It is normal to have soreness or pain for 1-3 days following trigger point release treatments. The following can be performed to reduce soreness:
* Ice or heat for 20 minutes, 3 times/day.
* Practice stretching, gentle exercise, slow, deliberate movement, or light walking to assist with keeping the muscles loose and circulation flowing.
* Stay hydrated to assist with the removal of waste products from the release of trigger points. It is recommended to drink ½ your weight in ounces. For example if you weight 150 lbs, drink 75 ounces of water per day.
* Use Kinesio tape over the sore muscles to assist with improved lymphatic drainage, congestion removal from the tissues and to help the muscles relax.
* Use Biofreeze or another pain relieving gel or cream, as needed.
* Use over the counter medications, as needed and if approved by your doctor.
* Consider a detox bath with Epsom salts and baking soda. Here are two simple recipes to try: Recipe #1: 3 cups of Epsom Salt (or 1 cup for every 60 pounds of body weight), 1 cup of baking soda, 1/3 cup hydrogen peroxide. Recipe #2: 1/3 cup Epsom Salt, 1/3 cup sea salt, 1/3 cup baking soda, 2 ½ tsp ground ginger and 1 cup apple cider vinegar.
*If you experience flu-like symptoms or headaches, this could be a Herxheimer Reaction from detoxification. Try dissolving ¼-½ teaspoon of baking soda in a small amount of water and drink every 3-4 hours until symptoms subside. Consult with your doctor or pharmacist first if you are taking medications or have other medical concerns.
Graston Technique
Graston Technique (GT) is part of a broader term, “Instrument Assisted Soft Tissue Mobilization” (IASTM) which uses instruments to perform myofascial release. Graston Technique (GT) is a trademarked therapeutic method for diagnosing and treating disorders of skeletal muscles and connective tissue or fascia. Only practitioners trained through the Graston Institute and using the patented instruments may claim to perform “Graston Technique.”
The method was started by David Graston and employs a collection of six stainless steel instruments of various shapes and sizes which are used by practitioners to treat adhesions in the muscles, tendons and related connective tissue or fascia. This technique, and the instruments used, enable the clinician to release scar tissue and fascial restrictions more specifically and directly. Ultimately allowing for faster rehabilitation and with greater success with the goal of restoring range of motion, eliminating pain, and restoring normal function. Yes, this technique gets “deeper” and is more specific than a massage.
Clinical Applications
Here is list of some of the most common conditions treated with Graston Technique® therapy.
- Ankle Pain (Achilles Tendinosis/itis)
- Wrist Pain (Carpal Tunnel Syndrome)
- Neck Pain (Cervical Sprain/Strain)
- Fibromyalgia
- Hamstring Injuries
- Hip Pain
- IT Band (Iliotibial Band)
- Tennis Elbow (Lateral Epicondylosis/itis)
- Back Pain (Lumbar Sprain/Strain)
- Golfer’s Elbow (Medial Epicondylosis/itis)
- Knee Pain (Patellofemoral Disorders)
- Heel Pain (Plantar Fasciitis)
- Shoulder Pain (Rotator Cuff Tendinosis/itis)
- Scar Tissue
- Shin Splints
- Trigger Finger
- Women’s Health (Post-Mastectomy and Caesarean Scarring)
There are some contraindications to having Graston Technique performed, meaning, instances where it should not be utilized. These include but are not limited to areas of open wounds or unhealed sites, thrombophlebitis, uncontrolled hypertension, inflammatory conditions due to infection, unstable fractures, hypersensitivity, osteomyelitis (bone infection) and contagious or infectious skin conditions. Please ask your provider if you have any questions or concerns.
The Benefits of Total Motion Release
- Teaches patients to fix themselves.
- Requires less visits than traditional therapy.
- Improves Patient Compliance – able to achieve results at home in sessions of 10 minutes or less.
- Is a life long skill that can be used for any ache or pain, be it chronic or acute.
- Works on a variety of conditions such as pre & post joint surgeries, herniated discs, arthritis or just ‘old age.’
- Helps with those who suffer from pain with prolonged standing, sitting or walking.
- Improves function & performance of daily activities and athletic performances.
- Did we mention – the patient learns to treat their own issues faster than most therapists can? That’s pretty cool!
Total Motion Release is being used in every setting of physical therapy:
- Orthopedics & Sports Medicine
- Pediatrics
- Home Health
- Neuro – Stroke & Brain Trauma
- Sub-Acute & Skilled Nursing
- Acute Care
- Aquatics
The Total Motion Release concept is simple:
- Find motions that are out of balance (left side versus right side) in the 5 largest joints of the body.
- Treat or Exercise toward the easier side to achieve fast & effective results.
- Use the Rules to Wellness to determine what to do no matter what happens to the patient.
- Then learn how to progress into more and more dimensions of motion so as to unlock more and more restrictions that have built up over the years.
- Learning the Total Motion Release process is an exact, step by step process that allows the therapist to teach everything he or she learned easily to their patient.
Total Motion Release systematically takes students and patients through each progression of the program until the desired results are achieved. The remaining 5% of patients who do not respond may need more hands-on care. The hands-on care we use still treats the patient using the same concept. We will know in just a few visits, not weeks, if a patient is not responding to treatment and needs to be referred out for additional care.
Can 6 exercises really make that big of a difference?
The idea that 6 exercises can have an effect on a large percentage of aches & pains and that the entire skill of fixing pain can be turned over to the patient can seem very unfathomable. I tell students, you should be skeptical. In order for this to ‘become part of you’ you have to see success using it again and again. It isn’t just 6 exercises, however 6 exercises builds a foundation that you and your patients can build off of. After the 6, you will learn to take each of them into 6 directions of motion, different body positions and alternates for when things aren’t working.
The Total Motion Release Program gives the patient the ability to fix themselves in a short period of time. It uses simple motions that a toddler can understand and provides a medically designed progression so the patient can improve to the level they desire. It is not only effective one on one, but can be applied to large groups.
Interesting patterns…
- Migraine headache sufferers – the eye in which they experience the throbbing headache is often times the side they have shoulder restriction.
- People who grind their teeth at night and are unable to open their mouth very wide are relieved both in tightness and in their ability to open their mouth simply by them gently compressing their teeth for two minutes.
- Plantar fasciitis may not resolve until the upper rib cage or upper thoracic is released.
- A person who is “unable” to stand up straight or backward bend can usually extend on one side easier than they can on the other side. Same goes for bending forward. A person who cannot bend forward, can bend forward if the bending is more one-sided.
- A person who is balanced in their tissues can spin around like a child and have very little, if any, dizziness. The more dizziness a person experiences with this activity the more restrictions will be found throughout the body (if you are going to try this – do it on yourself and not your patients.)
- Tail bone and pelvic pain is not completely eliminated (long term) if the thoracic area and rib cage is not made more flexible.
- Testing an individual for which eye they can see better out of is also the side of the shoulder/arm that is more flexible.
- An acute back pain sufferer hardly ever comes in stuck in extension. They are always slouched forward or to the side, and almost always the traditional form of therapy will try to get them standing up straighter rather than slouching over further. Have you ever tried to exaggerate what the body is doing – it is wonderful to see what effect this has on a person’s pain. Try it!
- Tightness of the hand also shows up in similar movements of the shoulder. For example, a restricted motion at the wrist – cocking the hand out to the side can present as a restriction at the shoulder of not being able to raise it up and back, as if being a driver and reaching behind the passenger side car seat.
- If one finds rotation restrictions at the shoulders, most likely the patient will also have rotation restrictions at the hips.
- When a person goes to squat down to pick something up, they invariably weight bear and squat down more on one side than the other.
- If a person is asked to move their jaw to side to side, the side they can move to further (8 times out of 10) has a tighter shoulder and arm of that side.
- Foot pain or issues of numbness and tingling also correspond to hand numbness or tightness on some occasions. Many people with plantar fasciitis also sufferer from tennis elbow, carpal tunnel, etc. in one or both of their upper extremities.
- Restriction of the trunk can show up as a variety of ailments from musculoskeletal to visceral. Free up trunk range of motion, and patients will tell you that all sorts of things have changed for them.
- Every person has a good side and a bad side for every movement. Next time you get out of a chair focus on which side you place more weight on. Chances are you do this every time you go to stand and sit down. I have found this asymmetry to be one of the root causes to many pain complaints.
- A pelvic shift and tailbone rotation causes a three dimensional issue in the entire spine and the patient usually has a variety of complaints they are seeing you for.
- People even have a good and bad side for which ear they can hear out of better and which eye they can see out of better.
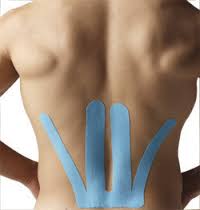
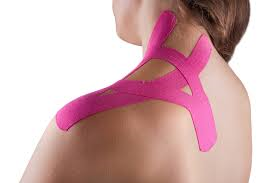
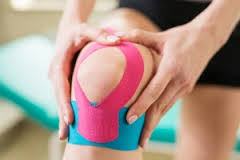
What is Kinesio Taping?
The Kinesio Taping Method has taken the Rehabilitation and Sports Medicine world by storm. Since its development by Dr. Kenzo Kase nearly 20 years ago in Japan, Kinesio Taping has become the standard therapeutic taping in the United States. This method of taping uses a uniquely designed and patented tape for treatment of muscular disorders and lymphedema reduction.
Since the introduction of Kinesio Taping into the U.S., medical practitioners from PTs, ATCs, OTs, DCs, MTs, to MDs have recognized and embraced this effective, safe, and easy-to-use modality. The tape, as well as the method in which it is applied, allow the individual to wear and receive the therapeutic benefits on a 24 hour/day basis, and can be worn for several days per application. Kinesio Taping is practiced in hospitals, clinics, universities, high schools, and by professional sports teams.
The Kinesio Taping Method involves taping over and around muscles in order to either, assist and give muscle support, or to prevent over contraction of the muscles. The first technique gives the practitioner the opportunity to actually give support with full range of motion that enables the individual to participate in physical activity with functional assistance. The second technique helps fight against overuse/contraction and helps provide 24 hour/day facilitation of lymphatic fluid. This technique is most commonly used in the acute state of rehabilitation. Lastly, there are many types of correctional techniques such as myofascial, lymph, and tracking (e.g. patella). Kinesio Tex Tape can be used in conjunction with other therapies including cryotherapy, hydrotherapy, massage therapy, and electric stim.

How Does This Stuff Work?
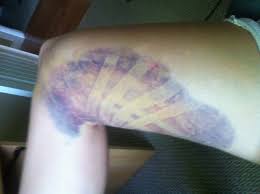
Over a bruise, Kinesio Tex Tape demonstrates the ability to increase circulation and facilitate lymphatic flow. These results are seen within 12 hours of application. This application was fan shaped Kinesio Tex Tape placed directly over the bruise.
1. Where did the word “Kinesio” come from?
The name comes from the science of Kinesiology, because the tape and taping method allow the body and muscles to move while it assists in rehabilitation.
2. What does Kinesio Tape and Taping do?
Kinesio Taping Method is applied over muscles to reduce pain and inflammation, relax overused, tired muscles, and to support muscles in movement on a 24 hour basis. Traditional sports taping is wrapped around a joint strictly for stabilization and support during a sporting event. In contrast, Kinesio Tape is non-restrictive, allowing for full range of motion. It is commonly used for treating headaches to foot problems and everything in-between. Examples include: carpal tunnel syndrome, lower back strain/pain (subluxations, herniated disc,) knee conditions, shoulder conditions, sports injuries, etc.
3. Why is Kinesio Tape so much more accepted than other tapes?
It has a number of benefits that are not achievable with other tapes:
- 100% High Grade Cotton – for comfort and breathing
- 140% Elastic – same flexibility as human skin and muscles
- Heat activated adhesive – although very light, mild and hypo-allergenic
- Latex Free
- Air Circulation Waves – to channel out sweat and water and enhance skin breathing
- Durable – average usage 3-4 days per application
- More Economical – usually 8-10 applications per roll
4. Is it the tape or the technique that gives such great results?
Without a doubt, the technique is the most unique, however, the full benefits were not possible until Kinesio Tape was developed. The taping method requires a tape that is patient and skin friendly, possesses optimum elastic qualities, the same thickness as the skin, and is durable enough to stay on multiple days even through sweat and showers.
5. How is the tape applied?
Without getting too technical, the tape is applied over the affected area with the muscles in a stretched position. It will run from one end of the muscle to the other with very little to no stretch of the tape. For support, the tape is applied from origin to insertion of the muscle, and for rehab purposes it is applied from insertion to origin.
6. Are there any concerns or difficulties with Kinesio Taping?
- Skin needs to be free of oil, sweat, and lotion prior to application
- After application rub down tape to activate heat sensitive glue
- Avoid extreme stretching of the tape during application to avoid skin irritation
- Apply approximately 1 hour prior to activity or shower to allow glue to adhere properly
- Skin irritation is extremely rare, but special care should be taken with hypersensitive skin patients
Kinesio Tape Information
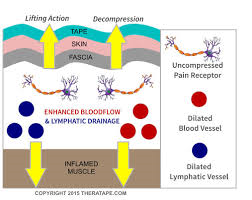
Kinesio tape is designed to gently create forces on the surface of the skin which elevate the tissue, relieving the pressures beneath the skin surface, thereby promoting increased circulation to the tissues and structures beneath the area taped. To assess the effectiveness of the taping procedure, you will be asked to help with the following:
It is ok to wear the tape in the shower, but please do not rub the tape with a towel or washcloth. To dry, blot the affected areas taped. Rubbing will cause rolling of the edges. The cotton fabric will dry in approximately 20 minutes. Do not use a hair dryer to dry the fabric as this may harden the acrylic glue, making removal of the tape uncomfortable.
If an itching sensation develops beneath the tape, remove the tape immediately. A small percentage of the population is sensitive to a salt build up caused by perspiration being trapped in the tape’s glue. If permitted to continue, skin reddening and irritation may result.
Please remove the tape approximately 24 hours before your next therapy visit. This will allow you to assess any further changes in pain levels that may occur. Inform your therapist accordingly. This will assist both you and the therapist in determining the direction of your therapy program. To remove the tape, pull in the direction of hair growth. Use a trailing finger under the tape, separating the skin from the tape. If difficulty in removal persist, soak the tape in water or use oil between the skin and tape upon removal.
Kinesio Taping Videos
Myofascial release therapy does more than relieve your myofascial pain and discomfort. There are a lot of people suffering from myofascial pain syndrome. Some say the pain is so bad they want to die. Certainly, the unbearable pain that is felt can be devastating.
Myofascial pain syndrome is a chronic type of pain that target the muscles, tendons and ligaments. This problem is so hard to identify because it doesn’t show up on x-rays and MRIs. This syndrome is usually diagnosed through physical assessment performed by a physician.
If you are one of these people who are diagnosed as having the syndrome, you may wish try an innovative mode of treatment known as myofascial release therapy. A certified therapist will be the one to perform this type of procedure.
It can sometimes be somewhat painful to undergo but it is considered safe and quite effective. And the outcome is well worth it.
Facts About Myofascial Release Therapy
Myofascial release therapy is a highly specialized fascia stretching technique intended for myofascial pain syndrome. This is done by a qualified therapist to relieve you from all the tension, pain and discomfort.
To better understand what myofascial release therapy is and why it works so well, you must first know something about myofascial pain syndrome. This condition typically affects the fascia which is a thin layer of connective tissue that covers all the muscles in the body. Myofascial syndrome occurs when pain and inflammation is present in the muscle fascia.
When you perform stretching exercises on your muscles, your fascia are also stretched. Every time you overstretch or strain yourself, your fascia shortens and tightens resulting in muscle spasm which is really painful.
This stressful event results in symptoms that revolve around the injured fascia and muscle tightness. Muscle tension can also put pressure on the nerves and muscles that can lead to agonizing pain and discomfort.
Details About Myofascial Release Therapy
The point of myofascial release is to stretch and relax the fascia. The stretching technique is performed by the therapist. He is being guided by your body’s feedback towards the firm compression on the muscles.
The therapist estimates how much pressure is used, what direction the pressure will be placed and the duration of the pressure. Portions of the muscles are stretched one at a time.
Most of the time, people with myofascial syndrome are unable to verbalize where the sore spots are located. The trained and licensed therapist will be the one to locate the trigger points through the use of gentle palpation. After locating the hardened muscles, the therapist will loosen them one by one.
With the use of his fingers, palms or knuckles, the therapist will gently stretch the first muscle that is chosen from the area of tightness. The muscle is stretched in different patterns depending on the extent of the pain that is felt on the trigger point.
When the tissue starts to relax, the therapist will increase the pressure and force that is applied. This method is repeated until the whole muscle is fully relaxed. After that, the therapist will proceed to the next muscle. Trigger points may easily disappear with the use of myofascial release therapy.
A lot of myofascial pain syndrome sufferers have been relieved from pain and discomfort following this therapy. Intended to release the muscle tension that is found all over the body, myofascial release therapy is not an ordinary massage treatment.
Craini Sacral Technique (CST) was pioneered and developed by osteopathic physician John E. Upledger following extensive scientific studies from 1975 to 1983 at Michigan State University, where he served as a clinical researcher and Professor of Biomechanics.
CST is a gentle, hands-on method of evaluating and enhancing the functioning of a physiological body system called the craniosacral system – comprised of the membranes and cerebrospinal fluid that surround and protect the brain and spinal cord.
Using a soft touch generally no greater than 5 grams, or about the weight of a nickel, practitioners release restrictions in the craniosacral system to improve the functioning of the central nervous system.
By complementing the body’s natural healing processes, CST is increasingly used as a preventive health measure for its ability to bolster resistance to disease, and is effective for a wide range of medical problems associated with pain and dysfunction, including:
- Migraine Headaches
- Chronic Neck and Back Pain
- Motor-Coordination Impairments
- Colic
- Autism
- Central Nervous System Disorders
- Orthopedic Problems
- Traumatic Brain and Spinal Cord Injuries
- Scoliosis
- Infantile Disorders
- Learning Disabilities
- Chronic Fatigue
- Emotional Difficulties
- Stress and Tension-Related Problems
- Fibromyalgia and other Connective-Tissue Disorders
- Temporomandibular Joint Syndrome (TMJ)
- Neurovascular or Immune Disorders
- Post-Traumatic Stress Disorder
- Post-Surgical Dysfunction
Muscle Energy Therapy, or MET, consists of osteopathic techniques used by therapists to help relax the muscles and stretch the joints. In their book “Trigger Points and Muscle Chains in Osteopathy,” Philipp Richter and Eric Hebge write that these techniques are popular because they are not dangerous and often successful, even if not performed correctly.
History
Muscle Energy Therapy may have been first developed to help treat muscle spasms and shortenings. However, the osteopath community often credits Fred Mitchell, Sr., who was influenced by osteopaths T. J. Ruddy and Carl Kettler with the development of the techniques in the late 1940s for treating joint dysfunction. Through the years, the techniques have been refined as studies come out on the neurophysiological properties of myofascial structures.
Defining Muscle Energy Therapy
Muscle Energy Therapy is when a osteopath or other related therapist asks a patient to tense a muscle from a controlled position against the accurate resistance of a therapist. The purpose of MET is to treat limited mobility in joints as well as stretch hypertonic muscles and fasciae. MET may also help to stimulate blood circulation in the area and change muscle tone with neuromuscular mechanisms. This can help to tone and strengthen muscles and joints, as well as help to alleviate pain.
Requirements
Muscle Energy Therapy requires patients to tense muscles while breathing in and out, as well as moving a joint in a certain direction. This therapy cannot be used on comatose or uncooperative patients. The book “Stretching Therapy: For Sport and Manual Therapies,” states that therapists must also be much stronger than a patient for it work, or ask a patient to exert only partial effort. One and a half minutes is considered standard for each exercise. Pain can be experienced if it goes on any longer. Joints need to return to a neutral position very slowly so that muscle spindles are not reactivated.
Contraindications
Patients need to be accurately diagnosed in order for MET to be effective. Therapists need to understand what triggers the pain, limits joint movement along with the cause of imbalance or incorrect motion pattern. Communication and coordination should be clear and concise between patient and therapist. Bones and muscles that are not healed should never undergo METon
Definition
Joint mobilization is a treatment technique used to manage musculoskeletal dysfunction. Most manipulative and mobilization techniques are performed by physical therapists, and fall under the category of manual therapy.
In most cases, at the end of a long bone there is a joint or articulation. The long bone is attached or joined to another bone by a joint. For example, the femur is attached to the tibia at the knee joint. The knee joint is made up of the surface of the tibia, femur, ligaments, and capsule. Thus, the knee joint is stable and yet mobile. When an individual is sitting in a chair and freely kicks his leg out (knee extension), the tibia moves, while the femur is stationary. However, at the surface of the articulating bones (tibia and femur), there is other movement. This movement is known as slide or glide; some have termed it “joint play.” When an individual kicks his leg out, the lower leg or tibia is not only moving forward, but also gliding across the end of the femur. Mobilization is the treatment technique that involves the clinician applying a force to mimic the gliding that occurs between bones. It is a passive movement, the goal of which is to produce a slide or glide. Mobilizations are usually completed at slow speed, sometimes with oscillations, and even with a “hold” or stretch. Manipulations are more aggressive, high velocity techniques, or thrusts. They occur very fast, and at the end of available joint play.
Purpose
Mobilizations are used to restore joint play that has been lost due to injury or disease. In order for an individual to kick his leg out, there must be sufficient joint play, or freedom for the tibia to move on the femur. Thus, mobilizations are used when range of motion or mobility is lacking. Furthermore, gentle oscillations within the available joint play range is a technique used to decrease pain. Manipulations are quick movements that occur beyond the available joint play range. The purpose of manipulations, or joint thrusts, is to increase the available range if it is not full. Secondly, manipulations are done to break adhesions that disrupt joint movement.
Results
If done appropriately, mobilizations can help reduce pain and restore joint play, which is critical for normal mobility, range of motion, and function.
